
How to build a mini arcade in your living room

How to build a mini arcade in your living room has become the ultimate DIY project for nostalgic gamers.
Anúncios
This endeavor combines modern technology with vintage aesthetics. It is a powerful statement against disposable, mass-market gaming.
The project celebrates the golden age of coin-operated entertainment at home. Creating a personalized shrine to retro gaming is deeply satisfying.
This guide will navigate the technical and aesthetic choices for 2025.
Why Nostalgia is Driving the DIY Market
The allure of the arcade cabinet is rooted in cultural memory. It represents a social, communal form of gaming that many miss.
Modern gaming systems offer complexity, but the simplicity of 8-bit classics endures. This emotional connection fuels the growing demand for home arcade solutions.
The retro gaming market is experiencing massive growth globally. Building your own machine is more than just installing software. It is a customizable journey into electronics, carpentry, and design.
The satisfaction of playing Pac-Man on a machine you constructed is unmatched. Technological advances now make this dream project affordable and accessible.
We are going beyond simple emulation on a PC screen. We are recreating the physical experience.
Why is the Raspberry Pi the King of Retro Emulation?
The Raspberry Pi single-board computer is the foundation of most modern builds. Its affordability and compact size make it ideal for mini cabinets.
The latest model, the Raspberry Pi 5, offers superb processing power. It handles complex arcade emulation with impressive fluidity. This small computer is powerful enough for classic 3D systems too.
The current price for the Raspberry Pi 5 8GB model is approximately $80 (USD, or equivalent conversion, as of late 2025). Its performance is critical for smooth gameplay.
The Pi’s large, supportive community provides extensive software and tutorials. This accessibility lowers the entry barrier significantly for beginners. It simplifies the often-complex setup of multiple emulators.
Alternative hardware, like an old Mini-PC or specialized handhelds, can also be used. However, the Pi 5 remains the most cost-effective solution.
Its GPIO pins offer easy integration with custom arcade controls. The power-to-size ratio is simply unmatched for cabinet projects. Choosing the right brain is the first step in learning How to build a mini arcade in your living room.
++ Forgotten bit‑generations: ColecoVision, TurboGrafx‑16 and more
What are the Best Options for Display and Control Interfaces?
An authentic arcade feel demands a high-quality display. Modern LCD monitors offer clarity and brightness that surpass old CRTs.
Look for screens with low latency to ensure precise, responsive gameplay. A 17-inch to 24-inch monitor strikes a perfect balance for mini-cabinets. The screen size should match the scale of your cabinet design.
The control panel is arguably the most important element for true immersion. Authentic arcade buttons and joysticks are readily available online. Brands like Sanwa and Seimitsu are favored for their durability and classic feel.
These components connect easily to the Raspberry Pi using a zero-delay USB encoder. This ensures professional-grade responsiveness for every button press.
The control panel layout should mimic a traditional two-player setup. Six or eight action buttons per player are typically recommended for versatility.
Do not skimp on the controls; cheap components ruin the retro experience. Investment here pays off with every satisfying “click.”
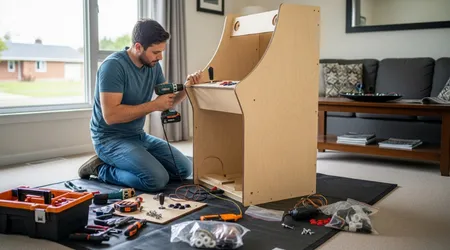
How to Assemble the Cabinet and Install the Software
Where Can I Find Reliable Arcade Cabinet Kits?
The construction phase starts with the cabinet shell itself. Many companies offer affordable, pre-cut CNC kits made from MDF or plywood.
These kits feature precise measurements and simple, slotted assembly instructions. They save considerable time compared to building from scratch. This makes the project feasible for non-carpenters.
Look for kits designed specifically for a 17-inch or 19-inch monitor size. The flat-pack design minimizes shipping costs and complexity. Some kits even include pre-drilled holes for the control panel layout.
This ready-to-assemble approach streamlines the physical build dramatically. It moves the focus back to the electronics and software integration.
Alternatively, some enthusiasts prefer custom 3D-printed miniature shells. These are perfect for tabletop or micro-cabinet builds.
The choice depends entirely on the available space in your living room. The structural integrity of the cabinet ensures the longevity of your investment.
Also read: Best emulators for legal retrogaming in 2025
Which Software is Essential for the Arcade Experience?
The Raspberry Pi requires a specialized operating system focused on emulation. RetroPie and Recalbox are the two most popular and reliable choices.
These systems package various emulators and a user-friendly frontend interface. They allow for easy navigation of vast game libraries with a controller. Setting up the software is crucial for enjoying the finished product.
Once the operating system is installed, configuration of the controls is necessary. Mapping the joystick and buttons ensures they work correctly within the emulator.
The process is generally straightforward and well-documented by the community. Proper configuration guarantees that games respond just like their original arcade counterparts.
Users must legally obtain their game copies. Many retro gaming enthusiasts utilize specialized devices to ‘dump’ ROMs from their legally owned physical cartridges.
What Enhancements Can Elevate the Mini Arcade Experience?
Why Should I Consider Themed Graphics and Lighting?
The aesthetic detail transforms a mere box into a convincing arcade machine. Custom vinyl graphics, called ‘side art’ and ‘marquee art,’ add crucial personality.
You can choose artwork from your favorite classic games like Galaga or Street Fighter. Many online vendors specialize in high-resolution, printed vinyl decals for cabinets.
Installing LED strip lighting beneath the control panel or within the marquee creates ambiance. LED lighting enhances the nostalgic glow synonymous with classic arcades.
This small addition makes the machine visually striking, even when turned off. It brings the vibrant, electric atmosphere of the 80s into your modern living space. Consider a dimmed overhead light for maximum effect during gameplay.
Read more: Nostalgic game tiers: ranking 80’s platformers
The Coffee Table Cabinet
Imagine Sarah, a graphic designer, wants a subtle arcade that fits her minimalist apartment. She designs a wide, low-profile cabinet resembling a coffee table.
The screen faces upwards, protected by tempered glass. The controls are detachable, allowing four players to join in easily.
The entire unit sits neatly next to her sofa. When not in use, it is a sleek piece of modern furniture. When powered on, the glow of the screen brings Mortal Kombat to life.
The Vertical Shooter Station
John, a dedicated fan of vertical-scrolling shoot-’em-ups (shmups), builds a specialized tall cabinet. He integrates a mechanism that allows the monitor to pivot 90 degrees.
This rotation, called TATE mode, fills the screen vertically with games like Ikaruga. The control panel features a precise, high-tension joystick and dedicated button layout.
This focused approach provides the most authentic shmup experience possible. This tailored solution perfectly illustrates why we learn How to build a mini arcade in your living room.
An Engaging Analogy: A Classic Car Restoration
Building a mini arcade is like restoring a classic car. You start with a basic shell (the cabinet kit) and choose a powerful engine (the Raspberry Pi 5).
You meticulously select and polish the bodywork (custom graphics and lighting). The result is not just transportation; it is a labor of love that honors an era. The value lies in the journey and the authentic, finished experience.
The Financial and Emotional Payoff: Why Bother with a DIY Build?
What is the Real Value of the Retro Gaming Market Today?
The nostalgia economy is not just anecdotal; it is a serious market segment.
The global retro gaming console market was valued at $3.8 billion USD in 2025 and is projected to grow substantially, representing a robust 10% compound annual growth rate.
This data, current for 2025, underscores the sustained consumer interest in classic gaming experiences.
Building your own arcade machine taps into this booming market. It offers a unique alternative to purchasing expensive, often limited, pre-built units.
DIY allows for unlimited customization and future-proofing the hardware. The result is a machine tailored to your exact gaming preferences. The emotional return on investment is arguably the greatest value.
What are the Key Components and Costs in 2025?
The cost of a custom build varies widely based on component quality and size. A budget-conscious project can cost as little as $300, focusing on basic parts.
A premium build, with high-end controls and custom lighting, can easily exceed $1000. This flexibility allows the project to fit almost any budget. Careful sourcing of components is key to managing the final price.
| Component Group | Budget Estimate (USD) | Premium Estimate (USD) | Why It Matters |
| Microcomputer | $60 (Raspberry Pi 5 4GB) | $120 (Raspberry Pi 5 16GB) | The core processing power for complex emulation. |
| Cabinet Kit / Materials | $80 (Basic Flat-Pack MDF) | $350 (CNC-Cut Plywood/Acrylic) | Aesthetics, durability, and size of the finished machine. |
| Display (Monitor) | $100 (Used 17″ LCD) | $250 (New 24″ Low-Latency IPS) | Image quality and response time are critical for gameplay. |
| Controls (Joysticks/Buttons) | $40 (Generic USB Encoder Kit) | $150 (Sanwa/Seimitsu & Zero Delay Encoder) | Authenticity, feel, and long-term mechanical reliability. |
| Power Supply & Cooling | $20 | $50 (Active Cooler, Quality PSU) | Ensures stable power and prevents thermal throttling of the Pi 5. |
| Total Estimated Cost Range | $300 – $1000+ | $300 – $1000+ | The final price reflects component quality and overall size. |
Conclusion: Crafting Your Gaming Legacy
The decision of How to build a mini arcade in your living room is an investment in fun and nostalgia. It is a rewarding project that combines technical skill with artistic expression.
The process yields a personalized machine perfectly tailored to your memories. Utilizing the power of the Raspberry Pi 5 and quality controls creates an authentic experience.
This project directly answers the widespread desire for tangible, high-quality retro gaming.
By meticulously selecting each component, you create a lasting piece of entertainment. This custom cabinet will bring immense joy to players of all generations.
Do you want to settle for generic, mass-produced nostalgia or craft your own perfect memory machine? The choice is clear for true retro enthusiasts.
Share your favorite classic arcade game and what custom features you would include in your build in the comments below!
Frequently Asked Questions (FAQ)
What is the Raspberry Pi 5 best for in an arcade build?
The Raspberry Pi 5 is the brain of the machine. Its quad-core Cortex-A76 and faster GPU are ideal for demanding arcade emulators like MAME.
It ensures smooth, lag-free gameplay, even for late-era 3D arcade classics. It offers the best performance-to-cost ratio in 2025.
Is it legal to download all the old games (ROMs) for my arcade?
No, the legality of downloading commercial ROMs is a legal grey area and often prohibited by copyright law. While emulators are typically legal, the game files are protected.
The safest and most legal route is to ‘dump’ (extract) ROMs from cartridges or disks you personally own.
What is the single most important component for an authentic feel?
The control panel specifically the joystick and buttons is the most critical element. Low-quality controls destroy the experience.
Using professional-grade components like Sanwa parts is essential for true arcade accuracy and durability.
How long does it typically take to complete a mini arcade project?
The time varies greatly by skill level and cabinet choice. If using a pre-cut kit, assembly, wiring, and software setup can take one to three weekends.
Building a cabinet from scratch significantly extends the timeline, potentially requiring several weeks.